I am going to be my 2006 Jeep Liberty Replacing harmonic balancer and crankshaft seal. Any advice. Seems pretty straightforward.
Thanks
Wanted to update this thread:
I finally got around to replacing the harmonic balancer and crankshaft seal on my 2006 Jeep Liberty. This is definitely a very doable job for anyone that can follow instructions and plan ahead (unlike me-ish).
Here are my steps I followed, and I will throw in a few links from youtube i used and some photos of the tools I used.
Tools needed:
- 10mm socket (fan)
- 16mm socket (tensioner pulley)
- 20mm socket (removal tool)
- 21mm socket (harmonic balancer bolt)
- Torque wrench
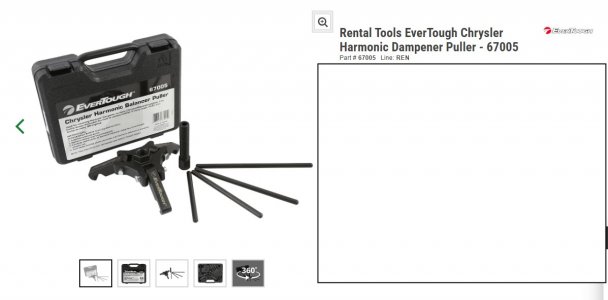
- Harmonic Balancer removal tool (Rented mine from O'Reilly's, see pic attached)
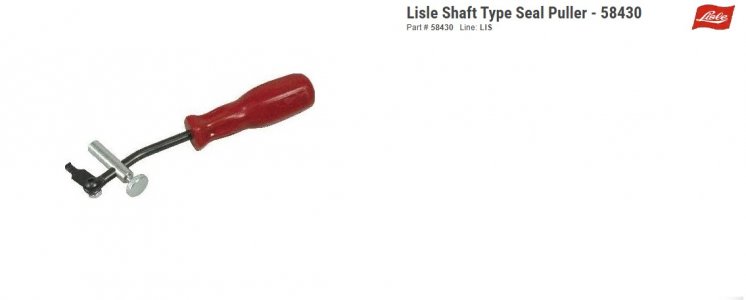
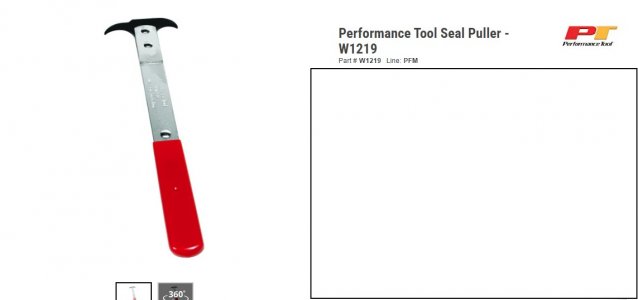
- Seal remover (There are 2 you can use. This was the ish portion for me. I did not have the tool, see pic attached)
- Oil (to lubricate the new harmonic balancer)
- Small rubber mallet (I used the one I had to remove dents)
- Larger mallet (see details below)
- Skinny crowbar
1. Take fan out. Unhook power, and then take out the 2 - 10 mm bolts near the top. Should pull out pretty decently. Set aside
2. Take belt off all pulleys. Using a 16mm socket on the tensioner pulley.
3. Take main bolt holding the harmonic balancer out using the 21 mm socket. More than likely the pulley/balancer will spin. Use the crowbar to wedge it in place. I don't think mine had been removed in 18 years, so i had to tug a little harder but it eventually gave in. Set bolt aside
4. Take the harmonic balancer removal tool. The one I rented came with a pressure bolt and adapter rods. Select the correct adapter rod. I used the longest adapter rod in the kit (7 1/2"). The tool basically wraps around the spokes on the balancer. I would put the adapter rod in first then the attach the removal tool, then add the pressure bolt.
5. Tighten the pressure bolt as tight as you can with your hand. Then grab the 20mm socket (the pressure bolt was a 20mm in the kit I rented) and start tightening the pressure bolt. Be patient, but you will start to see the harmonic balancer gradually start to move away and off the crankshaft. Go until the harmonic balancer loosens itself and pull it away with ease. Set the old harmonic balancer aside.
6. Next, it's time to remove the seal. I did not have the proper tool to remove it to start with. I thought, from post I read, I could easily use my pick tools. The picks I had did not have the leverage needed to remove the seal. Luckily for me, O'Reilly's is less than 5 minutes away. They had 1 of the 2 tools I needed (Performance Tool Sealer - in the pic attached - red handle and looks like a pick axe). I was able to hook inside the seal and rock it out of place after 2 attempts. Place old seal aside
7. Take a few minutes to clean around where the old seal was.
8. Next, time to install the new seal. As tough as it was originally to try to remove the old seal without the right tool, it was tedious to get the new seal in. I recommend pushing it in as much and far as you can with your own strength. Next, take the smaller rubber mallet and place it on the outside of the seal, kind of overlap it. Then take the larger mallet or hammer and lightly tap the small mallet. Do this very gently around the whole outside of the seal until it flush with the engine block. I originally tried to tap it with the small mallet but didn't have room to drive it in.
9. Next, time to install the balancer. There are tools out there to install, but I found it was not necessary from a video I watched, and it worked. Take the new balancer and apply a small amount of oil it and then align it up with notch (key) on the crankshaft. It should slide on pretty easy, mine did. You can definitely tell if it is off square or not. Make sure you feel that the balancer is square on. Then grab the balancer bolt and with the 21MM sock and torque wrench and tighten it to 130 ft lbs. You will need the crowbar again as you get near the end to fully tighten it.
10. Next, put the belt back on using the diagram shown under the hold. Use the 16mm socket for this. Make sure everything is aligned as it should.
11. Finally, put the fan back on and use the 10mm socket to tight the 2 bolts and attache the power.
12. Start the car and make sure everything looks as it should.
Sorry there is no video, I was learning as I was going. Now on to the AC evaporator core and Heater core.. (say a prayer)
links:
xc_hide_links_from_guests_guests_error_hide_media
(removal and installation of harmonic balancer)
xc_hide_links_from_guests_guests_error_hide_media
(Demo of how a harmonic balancer removal tool works)
xc_hide_links_from_guests_guests_error_hide_media
(if you don't have the seal tool)
xc_hide_links_from_guests_guests_error_hide_media
(demo of a variation of the seal tool I used)