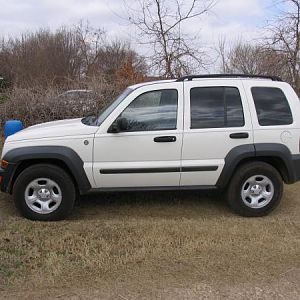
2009 KK Jeep scalloped driver front tire

Disclaimer: Links on this page pointing to Amazon, eBay and other sites may include affiliate code. If you click them and make a purchase, we may earn a small commission.

Hec In Omaha

New Member
Joined
Nov 17, 2024
Messages
15
Reaction score
16
Location
Beaver Lake, Nebraska
Howdy All!

I have been a lurker since Feb 2024. There is a lot of great information on this site and looking to hopefully be a contributor too!

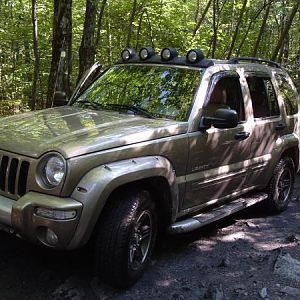
I have a 2009 Jeep Liberty KK Rocky Mountain Edition that I purchased in Feb 2024 for my teenage daughter to drive. It is in very nice condition with 126K now on the clock. When I purchased it, it had 121K on it. I purchased it from the original owner who was elderly and had only driven it less than 5K on it since 2018. She had a liver transplant in 2018, and the Liberty was too hard for her to get in and out of after her surgery so it sat in her garage basically unused. Her husband would drive it around occasionally. I also received 18 pages of documented service records performed at the dealer! All the service was done at the dealership. This includes tires! I have since changed out the front and rear diff fluids, transfer case fluid, changed the spark plugs, back flushed the heater core, flushed the cooling system and refilled using Zerex G-05 HOAT coolant, changed the accessory belt and belt tensioner, air filter and 2 oil/filter changes in the 6K miles my daughter has driven it. I ensured all 120k through 126k services needed were done on schedule. Oh yeah, the transmission fluid was replaced when the dealer replaced the transmission pan at 117K. The transmission fluid is clear red! Transmission fluid, front and rear diffs and transfer case fluids were changed at 60K too! It runs like a top and does not use any oil! I also installed an Alpine Head ILX-W670 Head Unit and back up camera and remote start. So, my daughter is all set. So that is the background information on it.

You must be registered for see images attach


So now on to today. I recently noticed a slight vibration at 62 MPH and figured the tires could use balancing. The tires are 2018 and only have 6K miles on them. I took it into a tire shop to investigate the vibration and right away the tech noticed that the driver’s side front tire showed scalloping on the inside tire edge. It is definitely noticeable. He said that is causing the vibration. He also showed me the passenger side front tire which is just beginning to show scalloping as well. He says that I need new front shocks and that is the reason for the scalloping. I had the tires rotated and now the Liberty rides so much smoother and the vibration caused by the scalloped tires are now at the rear. I can imagine how it must ride with all new shocks and tires!

I am planning on installing all the new shocks myself. The ball joints and bushings are all good and were checked by the tire shop.

Here is my parts list:

  • Front Right Shock KYB SR4199 – Complete Shock Assembly with spring and mounting plate.
  • Front Right Shock KYB SR4200 – Complete Shock Assembly with spring and mounting plate.
  • Rear Shocks KYB 344404
I want to retain the factory ride and not interested in lifting the Jeep. My daughter only drives 10 miles to and from High School and does not use it off road. There are certainly a lot of brands when it comes to shocks. I have read reviews, and Monroe seems to have mixed reviews. Do you all have any recommendations when it comes to shock brands? Are there any brands I should stay away from? I figured KYB is a trusted brand.

As always, I appreciate all comments.


Hec
 
Last edited:

KJowner

Full Access Member
Joined
Oct 20, 2022
Messages
1,492
Reaction score
865
Location
Uk
The springs will be worn out, it looks like its sitting very low at the front, the new bits should sort it out.
 

ikuo78

Full Access Member
Joined
Mar 13, 2024
Messages
193
Reaction score
210
Location
Japan
We rarely have the opportunity to test out several new shocks at the same time, so each new shock feels great.
KYB is a Japanese company that definitely has the top share in the new car installation and aftermarket markets in Japan.

Originally, the recommended replacement cycle for shocks is about 5 years.
After 7 to 8 years, the feeling of replacing it will increase.

I have Monroe front shocks and A-Premium rear shocks, and they are in very good condition.
I've only been driving it for two months since I replaced it.

I think you can get MOOG's lower arm ASSY cheaply in the US, so if you have the budget, it's better to replace it.
The alignment becomes stable.
The rubber bushing is already 15 years old.
 

Hec In Omaha

New Member
Joined
Nov 17, 2024
Messages
15
Reaction score
16
Location
Beaver Lake, Nebraska
Thanks everyone for your input. I am now planning on also replacing the following when I do the front shocks:

MOOG RK622148 Front Left Lower Complete Arm w/ Ball Joint
MOOG RK622147 Front Right Lower Complete Arm w/ Ball Joint
MOOG RK621565 Front Right Upper Complete Arm w/ Ball Joint
MOOG RK621564 Front Left Upper Complete Arm w/ Ball Joint
MOOG K750127 Front Sway Bar Links
MOOG ES800412 Front Right Outer Tie Rod
MOOG Front Right Outer Tie End
MOOG ES800413 Front Left Outer Tie End


This way all my bushings and ball joints will be freshened up. Should I also plan on replacing the Clevises?

Thanks in advance!
 

ikuo78

Full Access Member
Joined
Mar 13, 2024
Messages
193
Reaction score
210
Location
Japan
Good plan.
As far as alignment is concerned, the steering rack bushings are also generally ruined.
If it's installed the same way as KJ.
The type where the ends of the sleeves are crushed and expanded.
It seems that the oil that drips when replacing the oil element causes it to deteriorate, so even if the mileage is low, it is suspicious if maintenance is frequent.

The clevis is made of steel, so as long as you don't let it rust, it's fine.
 

Hec In Omaha

New Member
Joined
Nov 17, 2024
Messages
15
Reaction score
16
Location
Beaver Lake, Nebraska
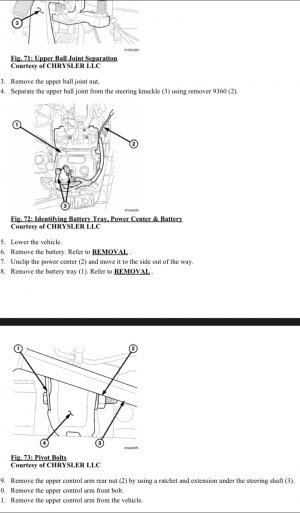
Did some research and have learned that removing the drivers side Upper Control Arm is a P.I.A.! Especially accessing the rear bolt. Any words of wisdom on how to remove the Upper Control arm bolts on a KK?
 

ikuo78

Full Access Member
Joined
Mar 13, 2024
Messages
193
Reaction score
210
Location
Japan
My KJ is RHD.
I can access the nut from under the car on the driver's side without removing the steering shaft.
Use a 50mm offset socket and a fine pitch ratchet handle.
I can only turn it about 10 degrees at a time because various things get in the way.
What about LHD KK?
 

Hec In Omaha

New Member
Joined
Nov 17, 2024
Messages
15
Reaction score
16
Location
Beaver Lake, Nebraska
My KJ is RHD.
I can access the nut from under the car on the driver's side without removing the steering shaft.
Use a 50mm offset socket and a fine pitch ratchet handle.
I can only turn it about 10 degrees at a time because various things get in the way.
What about LHD KK?


ikuo78


That is interesting. Right hand drive huh:oops:? Is the battery and TIPM on your drivers side too? If the battery and TIPM is on your passenger side, I would think your Right Hand Drive UCA change out would be easier than our Left Hand Drive KK's which have batteries and TIPM on the drivers side. My head hurts now. I need to lay down!:p

Hec
 

lfhoward

Wheel. Repair. Repeat.
KJ Supporting Member
Joined
Dec 9, 2012
Messages
2,449
Reaction score
2,710
Location
Philadelphia, PA
So true, the port side UCA rear bolt is a PITA! You will need a long extension or pair of extensions and get at it from the battery box area, after removing the battery box. To remove and reinstall the bolt once the nut is off, do so from outside the vehicle in the wheel well area, reaching under and behind the frame rail and up. It can be done.
 

ikuo78

Full Access Member
Joined
Mar 13, 2024
Messages
193
Reaction score
210
Location
Japan

ikuo78


That is interesting. Right hand drive huh:oops:? Is the battery and TIPM on your drivers side too? If the battery and TIPM is on your passenger side, I would think your Right Hand Drive UCA change out would be easier than our Left Hand Drive KK's which have batteries and TIPM on the drivers side. My head hurts now. I need to lay down!:p

Hec
That's right, the steering wheel is on the right side.
The TIPM and battery are on the left, so there's plenty of space on the right side.
There's no steering shaft on the left side, so if I remove the battery tray I can turn the nut with an extension.
I guess I'm lucky.
 

KJowner

Full Access Member
Joined
Oct 20, 2022
Messages
1,492
Reaction score
865
Location
Uk
That's right, the steering wheel is on the right side.
The TIPM and battery are on the left, so there's plenty of space on the right side.
There's no steering shaft on the left side, so if I remove the battery tray I can turn the nut with an extension.
I guess I'm lucky.
No luck involved we just drive on the proper side of the road ;-)
 

Hec In Omaha

New Member
Joined
Nov 17, 2024
Messages
15
Reaction score
16
Location
Beaver Lake, Nebraska
So true, the port side UCA rear bolt is a PITA! You will need a long extension or pair of extensions and get at it from the battery box area, after removing the battery box. To remove and reinstall the bolt once the nut is off, do so from outside the vehicle in the wheel well area, reaching under and behind the frame rail and up. It can be done.
Here are the factory instructions on how to remove the drivers side UCA. Piece of cake right? We will see!

Hec
 

Attachments

  • IMG_4273.jpeg
    IMG_4273.jpeg
    290.3 KB · Views: 9

Hec In Omaha

New Member
Joined
Nov 17, 2024
Messages
15
Reaction score
16
Location
Beaver Lake, Nebraska
I hope everyone had a great Thanksgiving! I did a lot of research here and other forums regarding rebuilding Liberty suspensions over the past couple of weeks. I have read a lot of posts regarding people not happy with installing OEM spec springs and shocks. Many experienced significant ride height settling which didn't fix the problems they had with their worn out springs and shocks. In a short time, they were right back where they started. Since the labor is essentially the same using OEM spec or upgraded components, I have decided to go with a mild lift vs. simply replacing parts with OEM spec parts. I will be installing all the components myself.

I was in El Paso, TX over Thanksgiving and dropped in at 4 Wheel Center. This is a very reputable off-road accessory shop.


I explained to the tech what I was considering. This is what we came up with. Install the OME/Bilstein rear shocks, new Spring Insulators, hockey puck bump stops and record the new rear ride height dimension measured from the center of the wheel to the fender opening. The 4 Wheel Center is going to preassemble my OME/Bilstein front shock assemblies. New top mounts and spring isolators will be installed as well. With the rear height measurements, they will ensure the adjustable front shocks are set so that I have a level ride height in front. Then they will ship the assembled front shock assemblies to me so I can install them.

I went ahead and ordered the following:

• OME 926 front springs since I am not adding any steel bumpers, winches etc.

• Bilstein B8 5100 24-282642 front shocks.

• Two New Mopar Front Clevis 4670456AB (Ebay)

• OME 2731 rear springs (EBay)

• Bilstein 24-185660 rear shocks (Amazon )

• JBA-5.5.00.EZ Upper Control Arms (JBA)

• Moog RK622147 Front Right Lower Control Arm (Rock Auto)

• Moog RK622148 Front Left Lower Control Arm (Rock Auto)

• Teraflex 1903200 Front Bump stops (Teraflex)

• 4- Hockey Pucks for rear bump stops. (Amazon)

• Moog K160059 Rear Coil Spring Isolators (Rock Auto)

• Moog ES800412 Right Outer Tie Rod End (Rock Auto)

• Moog ES800413 Left Outer Tie Rod End (Rock Auto)

• Moog K750127 Sway Bar Links (Rock Auto)


The Liberty should ride better than new when I am done with it! Wish me luck guys! I will start another thread of the install under KK lift kit discussion forum.

Hec

Edited for spelling corrections and front spring part number ;)
 
Last edited:
Top