Coolant/windshield fluid Bottle

Disclaimer: Links on this page pointing to Amazon, eBay and other sites may include affiliate code. If you click them and make a purchase, we may earn a small commission.

Phuc Nguyen

New Member
Joined
Dec 15, 2019
Messages
25
Reaction score
11
Hi everyone, I am new to KK model.
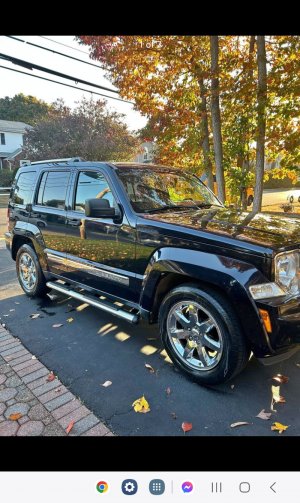
Just purchased a 2011 Liberty Limited Edition that needs some works done.
1). Wanted to check for transmission fluid level, but there is no dip stick, how do you check your fluid level.
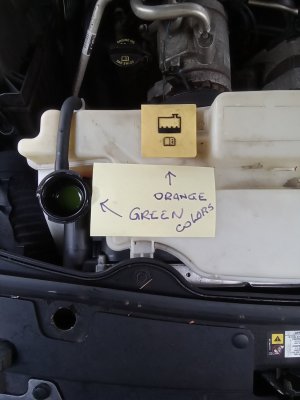
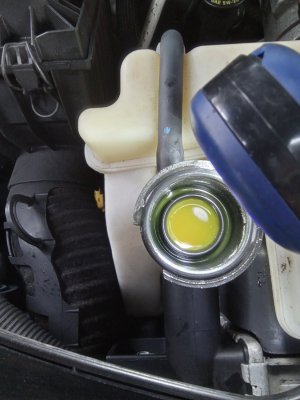
2). Looking down at the engine. The white plastic bottle on far right is windshield washer fluid, the one in middle is for coolant and has orange color, the one on far left has green color fluid, what is it.

Any help is appreciated.

Thanks in advance.
 

lfhoward

Wheel. Repair. Repeat.
KJ Supporting Member
Joined
Dec 9, 2012
Messages
2,423
Reaction score
2,673
Location
Philadelphia, PA
The left hand opening with the green is your radiator cap opening and the reservoir with the orange is the coolant reservoir for the radiator. The previous owner combined coolant types which is terrible and will lead to major clogging if the cooling passages and heater core if not flushed asap. The coolant should be replaced with 100% HOAT coolant (orange if Mopar, or gold if Zerex G05).

It is a good thing you caught this problem now and not later. Nice job thinking this isn’t normal. It’s not!
 

ShowMe Cherokee

New Member
Joined
Apr 13, 2024
Messages
8
Reaction score
14
Yes, Chrysler in their infinite wisdom, decided that us ignorant peons aren't qualified to check our own transmission fluid levels. So you have to buy one of these to do it yourself (fortunately not too expensive):

Transmission Fluid Dipstick

It does come with the temp chart so you can actually do the correct measurement.
 

Phuc Nguyen

New Member
Joined
Dec 15, 2019
Messages
25
Reaction score
11
Is it just me or does that green coolant look a little milky?

The left hand opening with the green is your radiator cap opening and the reservoir with the orange is the coolant reservoir for the radiator. The previous owner combined coolant types which is terrible and will lead to major clogging if the cooling passages and heater core if not flushed asap. The coolant should be replaced with 100% HOAT coolant (orange if Mopar, or gold if Zerex G05).

It is a good thing you caught this problem now and not later. Nice job thinking this isn’t normal. It’s not!
I will when all necessary parts replace for inspection in PA.
Purchased this Jeep from Lồng Island NY.
Currently in the works:
1)
The left hand opening with the green is your radiator cap opening and the reservoir with the orange is the coolant reservoir for the radiator. The previous owner combined coolant types which is terrible and will lead to major clogging if the cooling passages and heater core if not flushed asap. The coolant should be replaced with 100% HOAT coolant (orange if Mopar, or gold if Zerex G05).

It is a good thing you caught this problem now and not later. Nice job thinking this isn’t normal. It’s not!
Purchased this Jeep from Long Island NY, with low mileage. Drove 250 miles home without issue.
Engine and transmision are strong.

Currently in the works, prepare for inspection in PA once all the worn out parts replaced.
1. Replace upper and lower control arms, L & R. Done ✔️
2. Replace rear shocks. L & R. Done ✔️
3. Replace rear brake pads, L & R. Done ✔️
4. Replace spark plugs, ZFR6F-11G. Done ✔️
5. Replace cabin air filters. Done ✔️
6. Replace air filter. Done ✔️
7. Replace Muffler, tail pipe and resonator. Done ✔️
8. Front CV axle assembly, L & R.
9. Front spring/shock assembly, L & R.
10. Front hub/bearing assembly, L & R.
11. Transmission fluid and filter.
12. Flush cooling system, replace with G05 coolant, once bullet 8 thru 12 are completed.

Once all completed and inspected. This Jeep will serve us well for the next 10 years or more.

Have a heck of time trying remove front lug nuts, 4 out of 10 are seized and would not budge. Using lug nuts remover, didn't help but made it worse, snapped the nuts off leaving the chamfer portion stuck to the wheel. Drill out lug bolts, didn't help, all the bits are dull and worn out. Last resort, waiting for 1/4" shanks carbide metal grinding bits to arrive and try out to see any luck getting the front wheels off.

Thanks to everyone who responded.
 

Chad S

New Member
Joined
Jan 29, 2020
Messages
21
Reaction score
0
I will when all necessary parts replace for inspection in PA.
Purchased this Jeep from Lồng Island NY.
Currently in the works:
1)

Purchased this Jeep from Long Island NY, with low mileage. Drove 250 miles home without issue.
Engine and transmision are strong.

Currently in the works, prepare for inspection in PA once all the worn out parts replaced.
1. Replace upper and lower control arms, L & R. Done ✔️
2. Replace rear shocks. L & R. Done ✔️
3. Replace rear brake pads, L & R. Done ✔️
4. Replace spark plugs, ZFR6F-11G. Done ✔️
5. Replace cabin air filters. Done ✔️
6. Replace air filter. Done ✔️
7. Replace Muffler, tail pipe and resonator. Done ✔️
8. Front CV axle assembly, L & R.
9. Front spring/shock assembly, L & R.
10. Front hub/bearing assembly, L & R.
11. Transmission fluid and filter.
12. Flush cooling system, replace with G05 coolant, once bullet 8 thru 12 are completed.

Once all completed and inspected. This Jeep will serve us well for the next 10 years or more.

Have a heck of time trying remove front lug nuts, 4 out of 10 are seized and would not budge. Using lug nuts remover, didn't help but made it worse, snapped the nuts off leaving the chamfer portion stuck to the wheel. Drill out lug bolts, didn't help, all the bits are dull and worn out. Last resort, waiting for 1/4" shanks carbide metal grinding bits to arrive and try out to see any luck getting the front wheels off.

Thanks to everyone who responded.
I suggest adding a trans pan with a drain plug for ease in the future.
 

Members online

No members online now.
Top