
mrt100171
New Member
I know there have been others who have had to replace their Lower Control Arms, and have their own experiences. I thought I would share my experience/thoughts.
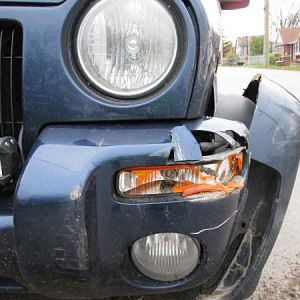
First off: the Passenger Side. When I was looking at this Jeep last November, I had noticed that the passenger-side arm was quite damaged. The dealer (a small guy in NH reselling auctioned stuff) indicated he would have this replaced, and I would be able to drive away with a valid Inspection Sticker (not trivial in NH).
Well getting ready for this year's inspection, I noticed a large crease in the aging muffler, which ended up causing damage to the entire thing. I don't think there is a good/safe way of prying an aged muffler without damaging it. Fortunately, I had a local Muffler Guy who replaced just the muffler and left everything else intact.
This was the first casualty of the horrible decision to do the bolt the way they did. It was clear that the guy who replaced this arm was doing this on the cheap, with little regard to much else.
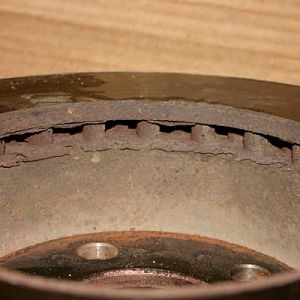
The Drivers' Side arm completely broke apart about a week ago. I had taken it to Valvoline for inspection (failed:front struts broken) and it was "fine" but rusted-through from the inside.
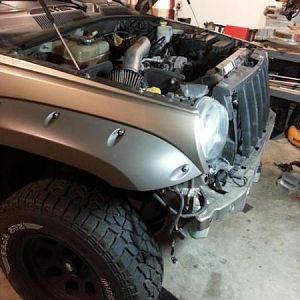
The "dealer method" for replacing: Drop Gas Tank. I don't think so! After seeing a couple posts on what to do, I secured replacement bolts (M14 x 110mm long) grade 10.8 bolts from my local hardware store (which is amazingly equipped). My grinder and cutoff tools were not able to get in deep enough to cut this bolt, and doing this so near the gas tank made me nervous anyways. I opted for the Sawsall method.
By loosening the bolt most of the way, and placing a bottle jack against the existing control arm fragment, I was able to move things around enough to give me a decent and stable cutting point. As a reward to my local hardware store, I bought a set of "thick metal" blades (Milwalkee "Torch" blades, in a 5-pack). They were a bit over-priced, but the bolts were only $5.40 each, and I like to support them when I can just for being there.
I was able to get the Sawsall under the Jeep, with the blade against the bolt, and get through the entire thing in about 20 minutes and about 1 1/2 blades (given there was a lot of "rest" time due to the angle and my general lack of strength). I was rather psyched that I finally got it out.
I did this all in my garage, using a couple jack stands under the rear axles. A Sawsall, the blades mentioned, and my hand tools. Fortunately, I had a Harbor Freight 3/4" drive socket wrench (I use for my JD backhoe) and impact-reducer to 1/2" socket size, and a good variety of shallow and deep metric impact sockets. I like this socket wrench as a pipe fits easily over the handle, which has bent in the past (removing hydraulic cylinder nuts, using an 8' pipe lever). Trust me, a small bend is worth getting those bad-boys off. And I am pretty weak, physically. Also, I have a set of decent quality 6-point open-end wrenches and both shallow+deep large impact sockets. I ended up buying the set of shallow ones at O'Reilly's because there was no 18mm size in my other collection, while replacing the first of 2 front struts (another story!).
The replacement arm (from TRS and Amazon) fit right in with no tools.
Naturally, I placed the nut on the Inside instead of the foolish factory choice. Torquing to 150 ft-lbs was only accomplished via use of a pipe section attached to the wrench. But I did it! Worth every cent of 1 1/2 sawsall blades. Now I have extras.
Other note: I wiped-down every rust-affected area of the body/frame/chassis and treated with Rustoleum Rust Reformer. I started doing this all the time, when I come across rust underneath. I don't seem to hear about a lot of folks doing this. I need to keep this thing driveable, and inspectable in a state that doesn't let you get away with dangerous vehicles at inspection time.
Regards, and thanks to everyone who has helped with Liberty maintenance.
First off: the Passenger Side. When I was looking at this Jeep last November, I had noticed that the passenger-side arm was quite damaged. The dealer (a small guy in NH reselling auctioned stuff) indicated he would have this replaced, and I would be able to drive away with a valid Inspection Sticker (not trivial in NH).
Well getting ready for this year's inspection, I noticed a large crease in the aging muffler, which ended up causing damage to the entire thing. I don't think there is a good/safe way of prying an aged muffler without damaging it. Fortunately, I had a local Muffler Guy who replaced just the muffler and left everything else intact.
This was the first casualty of the horrible decision to do the bolt the way they did. It was clear that the guy who replaced this arm was doing this on the cheap, with little regard to much else.
The Drivers' Side arm completely broke apart about a week ago. I had taken it to Valvoline for inspection (failed:front struts broken) and it was "fine" but rusted-through from the inside.
The "dealer method" for replacing: Drop Gas Tank. I don't think so! After seeing a couple posts on what to do, I secured replacement bolts (M14 x 110mm long) grade 10.8 bolts from my local hardware store (which is amazingly equipped). My grinder and cutoff tools were not able to get in deep enough to cut this bolt, and doing this so near the gas tank made me nervous anyways. I opted for the Sawsall method.
By loosening the bolt most of the way, and placing a bottle jack against the existing control arm fragment, I was able to move things around enough to give me a decent and stable cutting point. As a reward to my local hardware store, I bought a set of "thick metal" blades (Milwalkee "Torch" blades, in a 5-pack). They were a bit over-priced, but the bolts were only $5.40 each, and I like to support them when I can just for being there.
I was able to get the Sawsall under the Jeep, with the blade against the bolt, and get through the entire thing in about 20 minutes and about 1 1/2 blades (given there was a lot of "rest" time due to the angle and my general lack of strength). I was rather psyched that I finally got it out.
I did this all in my garage, using a couple jack stands under the rear axles. A Sawsall, the blades mentioned, and my hand tools. Fortunately, I had a Harbor Freight 3/4" drive socket wrench (I use for my JD backhoe) and impact-reducer to 1/2" socket size, and a good variety of shallow and deep metric impact sockets. I like this socket wrench as a pipe fits easily over the handle, which has bent in the past (removing hydraulic cylinder nuts, using an 8' pipe lever). Trust me, a small bend is worth getting those bad-boys off. And I am pretty weak, physically. Also, I have a set of decent quality 6-point open-end wrenches and both shallow+deep large impact sockets. I ended up buying the set of shallow ones at O'Reilly's because there was no 18mm size in my other collection, while replacing the first of 2 front struts (another story!).
The replacement arm (from TRS and Amazon) fit right in with no tools.
Naturally, I placed the nut on the Inside instead of the foolish factory choice. Torquing to 150 ft-lbs was only accomplished via use of a pipe section attached to the wrench. But I did it! Worth every cent of 1 1/2 sawsall blades. Now I have extras.
Other note: I wiped-down every rust-affected area of the body/frame/chassis and treated with Rustoleum Rust Reformer. I started doing this all the time, when I come across rust underneath. I don't seem to hear about a lot of folks doing this. I need to keep this thing driveable, and inspectable in a state that doesn't let you get away with dangerous vehicles at inspection time.
Regards, and thanks to everyone who has helped with Liberty maintenance.